While this article focuses on Umbraco, the approach can be applied to various CMS solutions, including Sitefinity.
Although Umbraco's marketplace offers plugins for managing tags and code snippets, relying on third-party solutions can be risky as they may become outdated, unavailable, or switch to a paid model. Additionally, how do you handle different tag manager snippets across multiple environments like development and staging?
Here's a straightforward solution for managing different Tag Manager snippets in Umbraco:
1. Create a site settings document type:
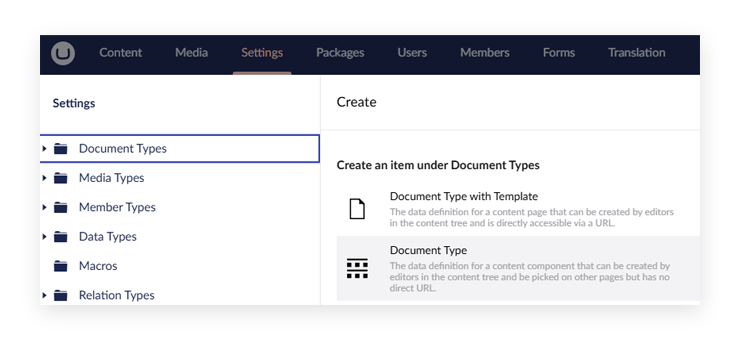
If you don't already have a site settings page in Umbraco where you can add your own custom settings, then go to the "Settings" tab and create a new Document Type. 
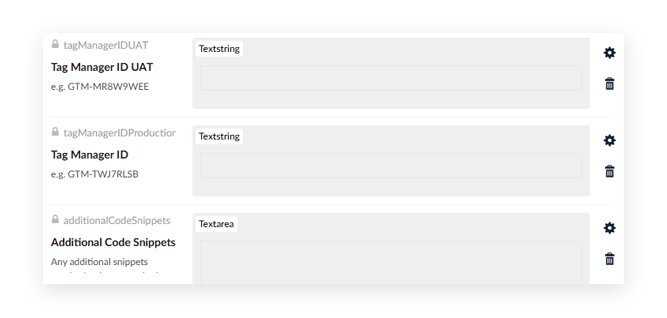
Give it a name, something like “Site Settings”, and then add 3 property types:
- Two text boxes (Textstring): "Tag Manager ID UAT" and "Tag Manager ID Production"
- One textarea: "Additional Code Snippets"
Note: "UAT" represents your staging/testing environment, while "Production" is for the live site

Finally, click on “Permissions” and make sure that “Allow as root” is enabled. 
2. Set up the site settings page
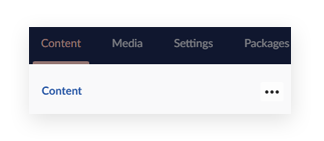
- Click on the Content tab and then click the three dots.

- Select your “Site Settings” option, and give it a name. Calling it “Site Settings” again is fine. Click Save and publish.
- Finally, click on “Info”, and take note of the Id. (this may be a 4 digit number)

3. Update your root/master template
Open your root Master template file (either in your project code or in Umbraco via Settings > Template > [Master])
Ensure you have this inheritance line at the top:
@inherits Umbraco.Cms.Web.Common.Views.UmbracoViewPage
Add a reference to your Settings Page: (Replace "1086" with your Site Settings page Id)
@{
    var settingsPage = @Umbraco.Content(1086);
}
Add the following code within the <head> tags:
@{
    string gtmIdUat = settingsPage.HasValue("tagManagerIDUAT") ? settingsPage.Value("tagManagerIDUAT").ToString() : "";
    string gtmIdProd = settingsPage.HasValue("tagManagerIDProduction") ? settingsPage.Value("tagManagerIDProduction").ToString() : "";
    if (gtmIdProd.IndexOf("GTM-") != -1 || gtmIdUat.IndexOf("GTM-") != -1)
    {
        <!-- Google Tag Manager -->
        <script>
            window.tagManUatId = '@gtmIdUat'; // UAT
            window.tagManProdId = '@gtmIdProd'; // Prod
            window.tagManId = window.location.href.includes('www.yourdomain.com') ? tagManProdId : tagManUatId;
            function loadGTM(w, d, s, l, i) {
                w[l] = w[l] || []; w[l].push({ 'gtm.start': new Date().getTime(), event: 'gtm.js' });
                var f = d.getElementsByTagName(s)[0], j = d.createElement(s), dl = l != 'dataLayer' ? '&l=' + l : ''; j.async = true;
                j.src = 'https://www.googletagmanager.com/gtm.js?id=' + i + dl; f.parentNode.insertBefore(j, f);
            }
            loadGTM(window, document, 'script', 'dataLayer', window.tagManId);
        </script>
    }
}
@if (settingsPage.HasValue("additionalCodeSnippets") && settingsPage.Value("additionalCodeSnippets").ToString().Contains("<"))
{
    @Html.Raw(settingsPage.Value("additionalCodeSnippets"))
}
In the code above, replace www.yourdomain.com with your live/production website URL.
Now, we can load in different tag Manager container IDs based on the current domain name, and we are also allowing the output of additional code snippets outside of Tag Manager if required.
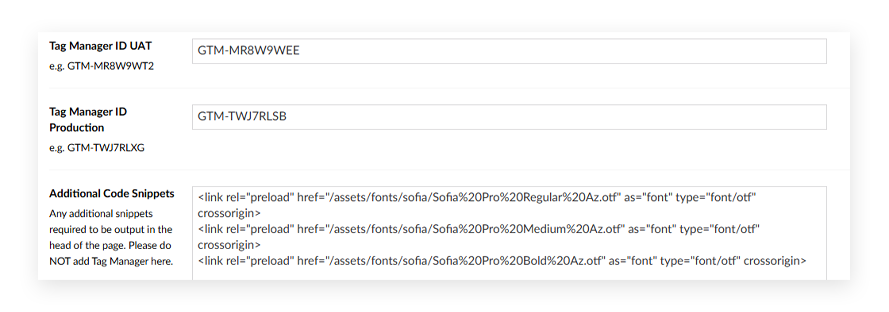
Example Usage:

By following these strategies for managing Tag Manager in Umbraco across multiple environments, you can streamline your tracking processes, reduce errors, and maintain consistent data insights across development, staging, and production. With a well-organised setup, you'll be able to focus less on troubleshooting and more on leveraging the power of your analytics. Start implementing these best practices today, and see the difference it makes in your workflow and data accuracy.